One of the benefits of organizing a program into methods is that it helps developers to create and test small pieces of the program separately, rather than creating and testing the program as a whole. In this section, you will learn about test-driven development and unit testing.
A unit test is a program that tests a class or method to see if it works properly. Developers create unit tests to test a class or method all by itself, before integrating it into the actual application they are creating.
As an example of a simple unit test, let's create one for the Reverse method used in the PalindromeChecker program introduced earlier in this chapter.
Example 6.3. ReverseTest.cs
using System;

class ReverseTest
{
    // Returns a reversed copy of <str>
    static string Reverse(string str)
    {
        string copy = "";
        for (int i = str.Length - 1; i >= 0; i--)
        {
            copy = copy + str[i];
        }
        return copy;
    }

    // Unit test code
    static void Main()
    {
        string result = Reverse("DRY");
        Console.WriteLine("result = " + result);
    }
}
To write this program, I copied the Reverse method from the PalindromeChecker program, and wrote a small Main method to call Reverse and display the result. To perform the test, run the program, and inspect the output. If Reverse is written correctly, the output result = YRD should appear.
Notice that the Main program does not prompt the user for input. The "DRY" test input is embedded directly in the test program as a string literal. Embedding test data in the unit test is preferable because it allows the same test to be run repeatedly. If the Reverse method is not working properly, the developer can run the test, note the problem, make a change to Reverse to try to fix the problem, and re-run the same test to see if the problem was fixed.
Unit tests are helpful because they can speed up the program development process in the following ways:
Methods that contain bugs can be difficult to test in the context of a large application.
A good unit test should be completely automated. When run, the test should indicate whether it passed or failed. The developer running the test should not have to interpret the results to determine whether the method being tested is working properly.
Fortunately, automated unit tests are easy to write with the assistance of the Debug.Assert method. Here is our unit test rewritten to use Debug.Assert:
Example 6.4. ReverseTestAuto.cs
using System;
using System.Diagnostics;

class ReverseTest
{
    // Returns a reversed copy of <str>
    static string Reverse(string str)
    {
        string copy = "";
        for (int i = str.Length - 1; i >= 0; i--)
        {
            copy = copy + str[i];
        }
        return copy;
    }

    // Unit test code
    static void Main()
    {
        string result = Reverse("DRY");
        Debug.Assert(result == "YRD");

        Console.WriteLine("All tests passed...");
    }
}
When the developer runs this program, the Debug.Assert method performs the comparison in parenthesis. If the result contains the expected value, Debug.Assert does nothing, and the message "All tests passed" appears. But if the result does not contain the expected value, Debug.Assert displays an error dialog like this:
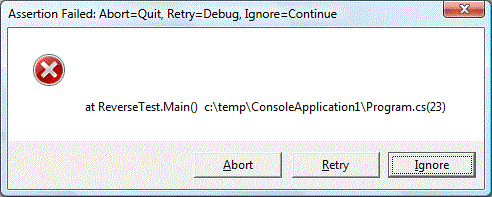 |
When this message appears, click one of the following:
Click Abort to stop the unit test program
Click Retry to use the debugger to view the values of variables
Click Ignore to continue the unit test program
Now that you have seen a simple unit test, let's take a closer look at Debug.Assert and the techniques involved in writing unit tests.
The Debug class is in the System.Diagnostics namespace. To use Debug.Assert, include the statement
using System.Diagnostics;
at the top of your unit test program.
The Debug.Assert method expects a boolean-valued expression in parenthesis. It checks the result of the comparison: if true, it returns silently; if false, it displays an error. This design allows you to to include several tests in one program. For example, we might want to verify that the Reverse method works properly for empty strings as well as strings with just one symbol:
    // Unit test with multiple tests
    static void Main()
    {
        string result = Reverse("DRY");
        Debug.Assert(result == "YRD");

        string result2 = Reverse("");
        Debug.Assert(result2 == "");

        string result3 = Reverse("X");
        Debug.Assert(result3 == "X");

        Console.WriteLine("All tests passed...");
    }
If any of the tests fail, an error dialog will appear, indicating the line number of the failed test.
A good unit test should include several calls to the method being tested. One or two calls should test typical use of the method; additional calls should test how the method behaves with parameters that contain borderline or exceptional values. Of course, if the method is not intended to work properly for unusual values, the unit test does not need to check that behavior. For clarity, the method header comments should indicate the legal range of acceptable inputs for each parameter.
You can use sophisticated boolean expressions in Debug.Assert, if you want. For example, the test program above could have been written in a more compact form:
    // Poor unit test
    static void Main()
    {
        string result = Reverse("DRY");
        string result2 = Reverse("");
        string result3 = Reverse("X");

        Debug.Assert(result == "YRD" && result2 == "" && result3 == "X");

        Console.WriteLine("All tests passed...");
    }
In this example, only one Debug.Assert call is needed to check the results of all three comparisons. Although this might seem like a more efficient way to write unit tests, it is not a good practice, because if the Debug.Assert call reports a problem, the developer cannot easily determine which test failed.
By the way, I should note that it is not possible to write automated unit tests for just any method. The Reverse method has the following important characteristics that make it possible to write an automated unit test for it:
It does not prompt for input. It gets all of its input from parameters.
It does not display output. It returns its result using a return value.
Automated unit tests are possible only when the methods to be tested get input from parameters, and return results using return values or reference parameters. Developers who use unit tests as part of their development practice design their methods with these constraints in mind.
Now that you know what a unit test looks like, let's discuss how to incorporate unit testing into the process of writing software. You might suppose that developers typically create unit tests after writing the code to be tested, and some developers do that. But a more effective approach involves writing the test before implementing the method. That may sound a little strange, but writing the test first has a number of advantages. Here's how Test-Driven Development works:
The developer creates a stub for the method he wants to write. A stub is a method interface with an empty body (for a void method), or a body that consists of a single return statement (for a non-void method). Here is a stub for the Reverse method:
    static string Reverse(string str) {
      return "";
    }
Next, the developer writes a small unit test that calls the method and tests its result. Here is what the code might look like:
class ReverseTest
{

    // Returns a reversed copy of <str>
    static string Reverse(string str)
    {
        return "";
    }

    // Unit test code
    static void Main()
    {
        string result = Reverse("DRY");
        Debug.Assert(result == "YRD");

        Console.WriteLine("All tests passed...");
    }
}
Next, the developer runs the unit test. It should fail, of course, since the method isn't implemented yet.
The developer writes the code for the method, and runs the unit test again. If it fails, he debugs the method and makes changes until it passes.
The developer adds more tests to his unit test program to verify that the method works properly for the parameter values it is designed to handle.
After the developer is satisfied that the method works properly, he integrates it into the real application he is developing.
Working with this "test-first" approach takes some discipline, but yields many benefits. For example, debugging a method in the context of a unit test is much easier and quicker than debugging the same method in the context of a full application. In a complete application, debugging an individual method involves setting a breakpoint, running the application, and using the application interactively until the breakpoint is reached. Depending on the application, this can require significant effort and time. In the context of a unit test, no user interaction is involved, because all of the test data is hard-coded ino the unit test program, and breakpoints are hit quickly when the unit test runs.
The effort required to create a unit test program can deter even experienced developers from using Test-Driven Development. However, a TDD best practice involves creating a minimal 2-3 line unit test program initially, rather than attempting to write a complete series of tests. Then, after implementing enough of the target method to make the test pass, the developer adds another line or two to test a different scenario. Those who practice TDD speak of a rhythm of writing a couple of lines of test code, writing some implementation code in the target method, testing and bug fixing, then writing some more test code, adding some more implementation code, testing, and so on. No one likes to spend large chunks of time writing unit test code, because it is, after all, code that does not contribute to the functionality of the target application. By writing little bits at a time, a dveloper spreads the effort of writing unit test code over a larger time frame, and that tends to reduce the drudgery.
When introduced to TDD, many developers think, "Sure, that sounds like it would be a good thing. But wouldn't it slow me down?" Paradoxically, many have noted that following TDD can actually speed up their development work. That's because writing new functionality in the context of a simple automated unit test results in faster edit-compile-test cycles. Experienced developers know that writing code for new functionality is a relatively small percentage of the effort; most of the time involves testing and debugging that code. Thus, the time spent writing a few lines of unit test code is repaid when it comes to the speedup achieved during the testing and debugging of the target code.